Audience: Retailers using the On-Demand Onboarding process.
In this article, you will find information related to the Onboarding page . The sections within this article are outlined below:
- Prerequisites
- Onboarding Page
- Vendor Integrations Page
- Process Overview
Implement On-Demand Onboarding
The Onboarding page is only available to retailers that are using our On-Demand Onboarding process. To find out more and see how this process would work with your organization, reach out to your Client Success Manager. This service is free of charge but does require additional setup from Logicbroker.
Set up permissions
You must have the permissions: integrations/manage enabled to see this page - see Manage Users for more information on how to get setup
Log in using the stage portal
The Onboarding page is only available in the stage portal as all onboarding tasks take place in stage so be sure you are using the correct portal.
Onboarding Page
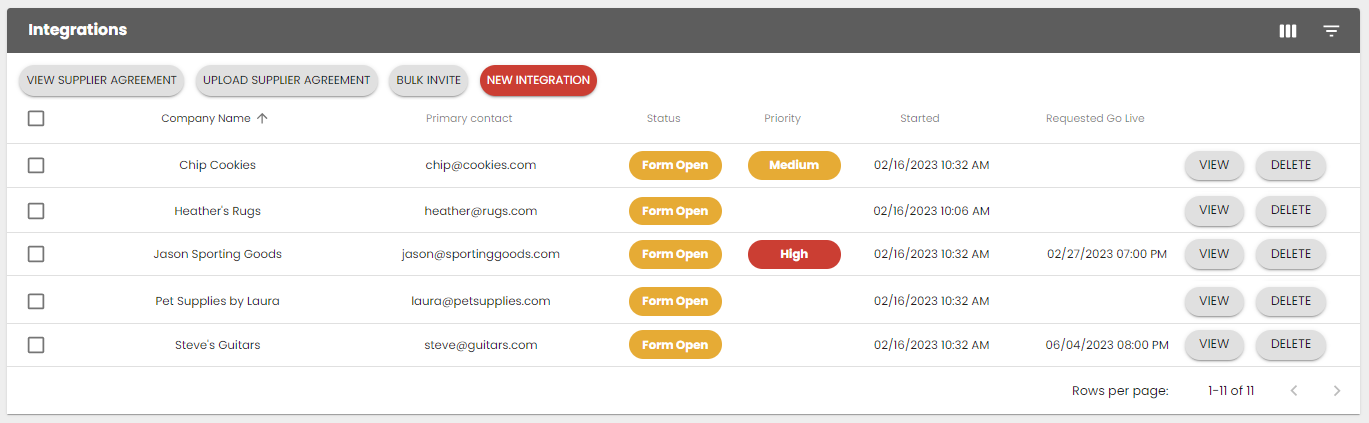
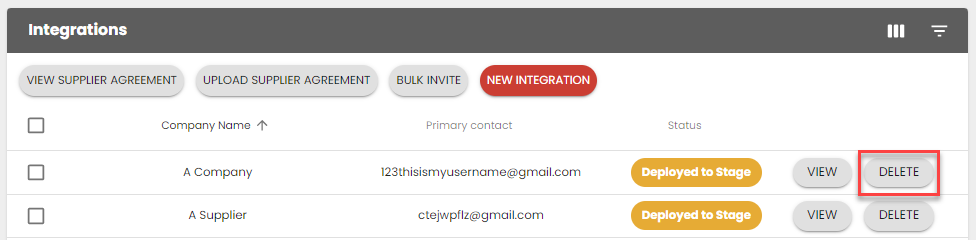
The Onboarding page is where retailers are able to initiate, manage and see all their new vendor onboardings. Retailers can take action on vendor accounts to push them along the process.
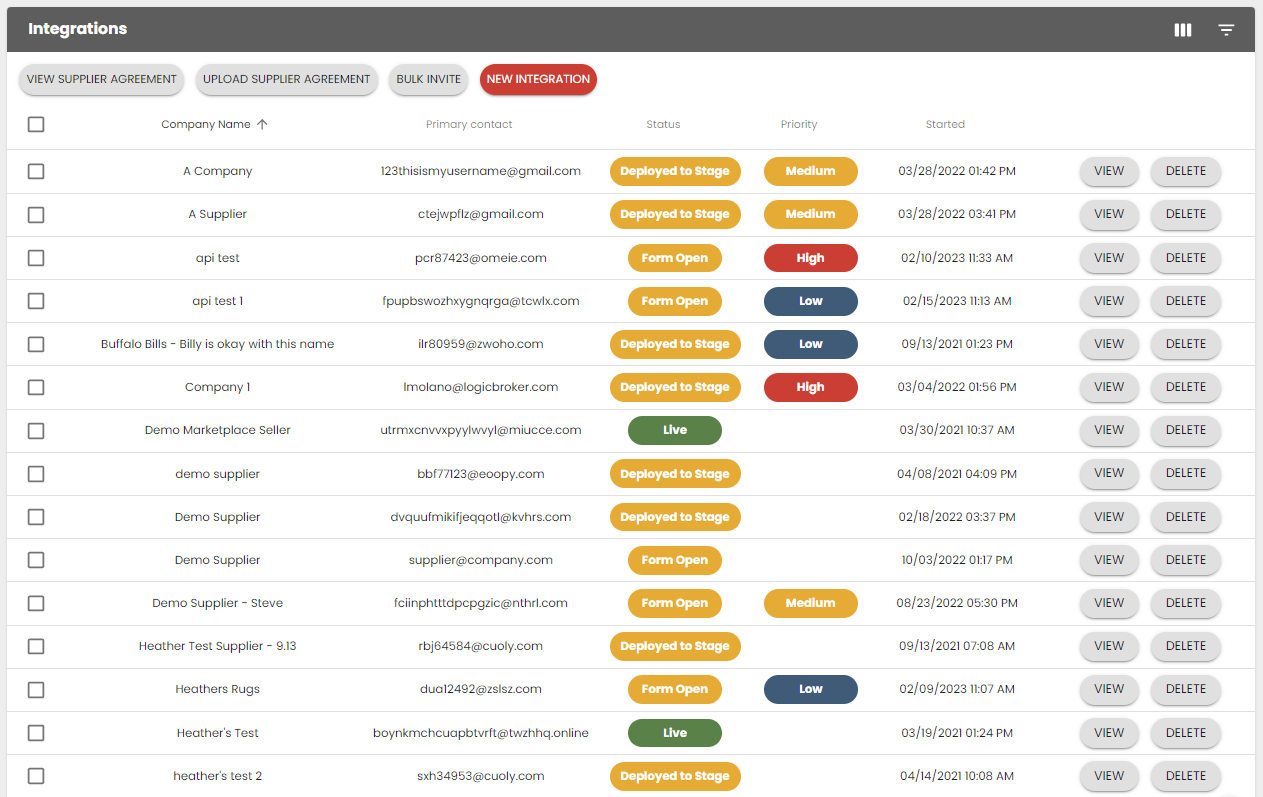
- Form Open - the retailer has sent that New Integration email
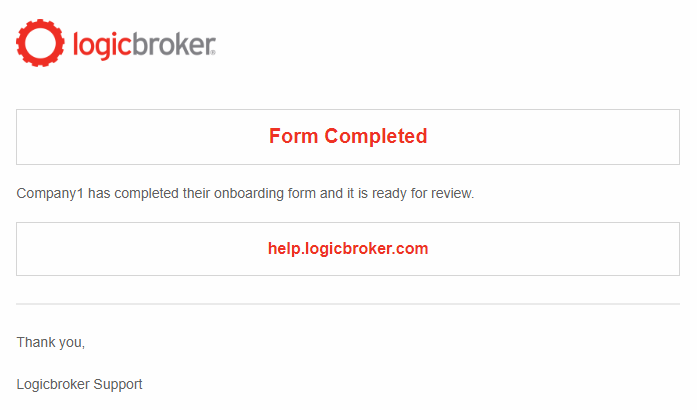
- Form Completed - the vendor has completed the Integration Form
- Deployed to Stage - the retailer has accepted the Integration Form
- Live - the retailer has pushed the vendor account into production
- Low
- Medium
- High
- Ignored - this priority level is used to ignore a vendor integration since once deployed to stage, integrations cannot be deleted


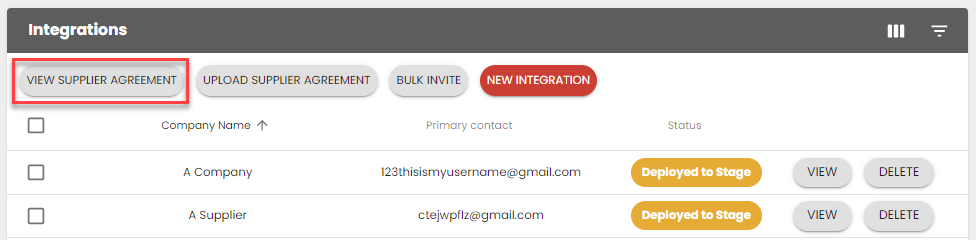
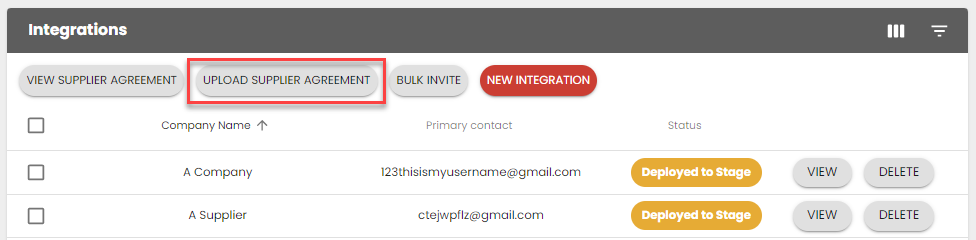
The Supplier Agreement is an optional tool retailers can use as part of their vendor onboarding process. This document can be used to share vendor agreements or terms and conditions with the vendor at the beginning of the onboarding process. This is mostly used in marketplace scenarios as dropship tends to have more redlining and negotiations between parties.

There are two ways retailers can onboard a new vendor, in bulk or individually:
- Click on the Bulk Invite button
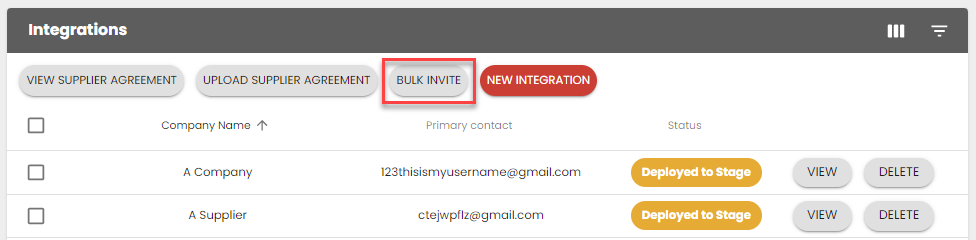
- Download the template and fill out:
- *Company - required - do not include vendor or account ID numbers
- *Email - required - this email must be unique, you cannot use the same email that you used for another vendor integration
- Priority - optional - this field is only visible to the retailer in the Integrations page (Allowed values are: low, medium, high)
- Requested Go Live - optional - this will be reflected on the New Integration email and is meant to set an expectation for the vendor
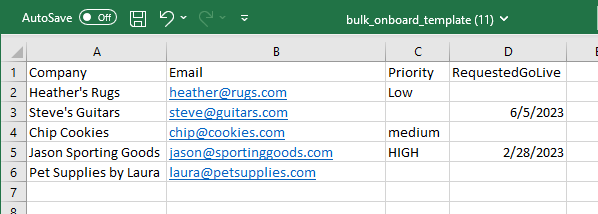
- Save your file and upload it
- Click Send Invites
- Review results and fix any errors
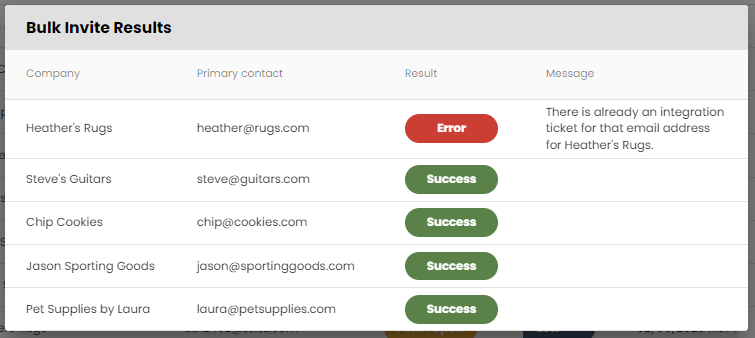
- See the new integrations in the Integrations page
- Click on the New Integration button
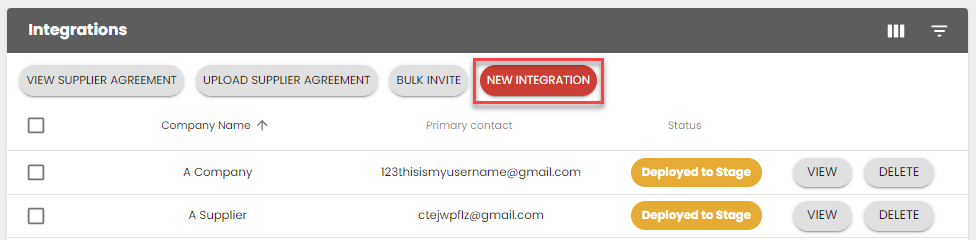
- Fill out:
- *Company - required - do not include vendor or account ID numbers
- *Email - required - this email must be unique, you cannot use the same email that you used for another vendor integration
- Priority - optional - this field is only visible to the retailer in the Integrations page (Allowed values are: low, medium, high)
- Requested Go Live - optional - this will be reflected on the New Integration email and is meant to set an expectation for the vendor
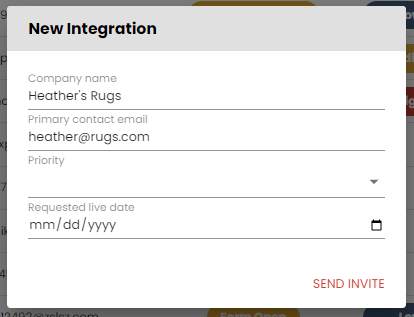
- Click Send Invite
- See the new integrations in the Integrations page


Vendor Integration Page
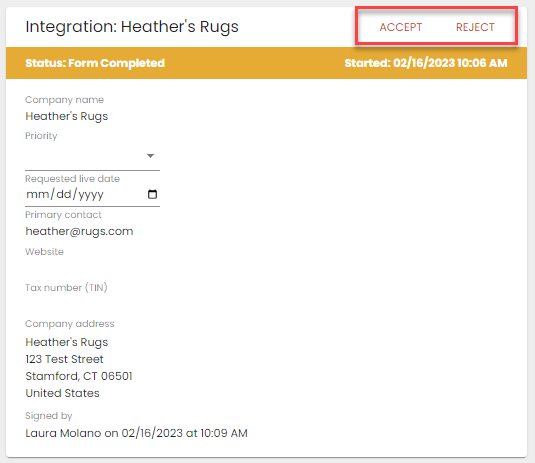
Click on View on any of the vendors to see the Vendor Integration page. This page displays details on a specific vendor including status, form details and account updates.
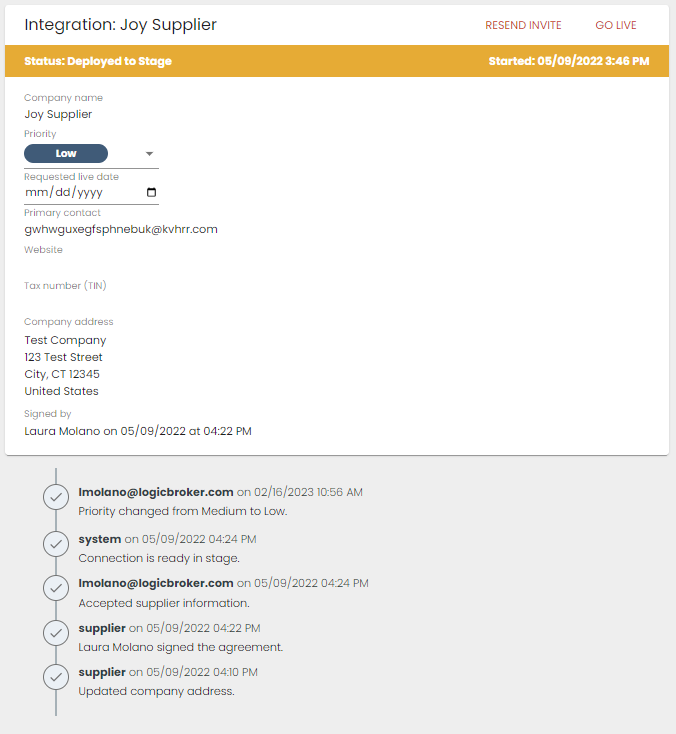
- If rejected: the vendor will receive an email notification with the rejection reason and the opportunity to go back and edit the information
- If accepted: the vendor account will be deployed to stage and they will receive 2 emails:
- Welcome to Logicbroker! - this email will allow the vendor to create a username and password - it expires in 7 days
- Connection with Retailer is ready for testing - this email will direct the vendor to the stage portal to begin testing
Process Overview
This section will go over the process of onboarding a vendor using the Onboarding page.
1. Retailer sends out the new vendor invitation in the portal by clicking on the Bulk Invite or New Integration buttons.
Status: Form Open
2. Vendor receives the New Integration email 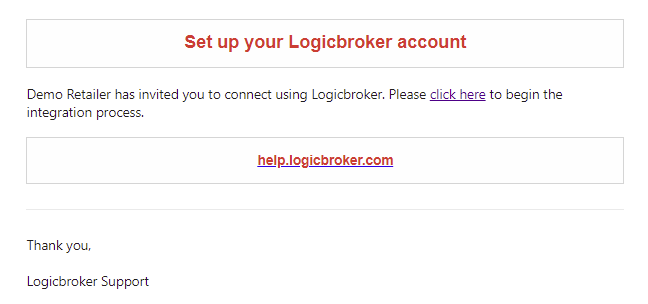
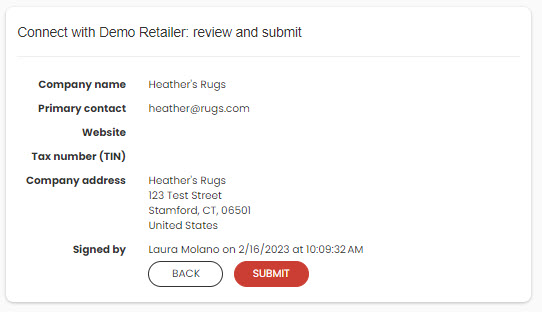
3. From the New Integration email, the vendor clicks on the link to be directed to the Integration Form. This form will ask the vendor:
-
- If they are using an existing account or creating a new one

- Company information (only fields marked with an asterisk are required)


- Sign the Supplier Agreement (only if the retailer uploaded one to their account)
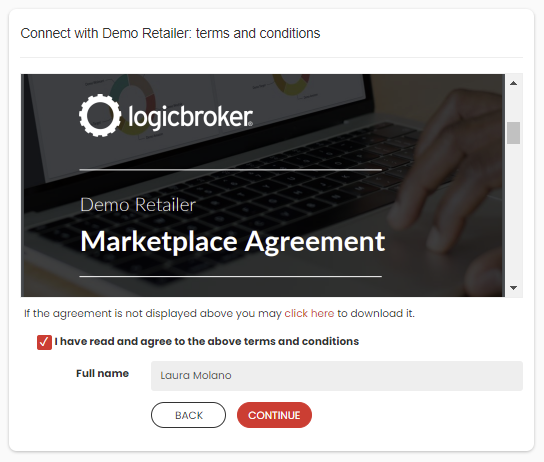
- Review and submit
- If they are using an existing account or creating a new one
Status: Form Completed
4. Once the vendor completes the Integration Form, the retailer will receive a Form Completed email (as long as they have the Trading Partner Notification enabled).
5. The retailer will look for the vendor in the Onboarding page in the portal > click on View > Accept or Reject the Integration Form
6. If the retailer rejects the form, the vendor will receive an email notification letting them know why it was rejected and will allow them to make adjustments to the form which will be reviewed again the retailer.
Status: Form Open
If the retailer accepts the form, the vendor account will be deployed to stage and the vendor will receive 2 emails:
-
- Welcome to Logicbroker! - this email will allow the vendor to create a username and password - it expires in 7 days
- Connection with Retailer is ready for testing - this email will direct the vendor to the stage portal to begin testing
Status: Deployed to Stage
7. The vendor will follow along with onboarding documentation provided and complete onboarding tasks.
8. The vendor will reach out to the retailer once they are finished onboarding. The retailer will click on the Go Live button in the portal and the vendor will be deployed to production.