Creating an acknowledgment is how a vendor/supplier communicates that the order has been received and the items have been accepted (or not).
Create an Acknowledgement in the Portal
1. There are two ways to pull up an order that you would like to acknowledge.
-
-
- Option 1: Use the Searchbar at the top of any page in the Portal and enter the order number. This will pull up all related documents to the order (the order as well as any existing shipments, returns, and/or cancellations).
- Option 2: Click on Ordersin the left-hand menu, and from the Order Managementpage, find the order.
-
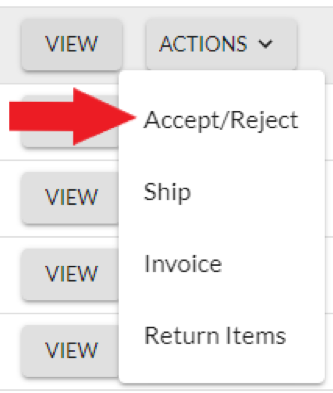
2. On the Order Managementpage, click on Actionsand select Accept/Reject.
3. You will be taken to the Create Acknowledgementpage. This is where you will accept, reject, and/or backorder items on an order.
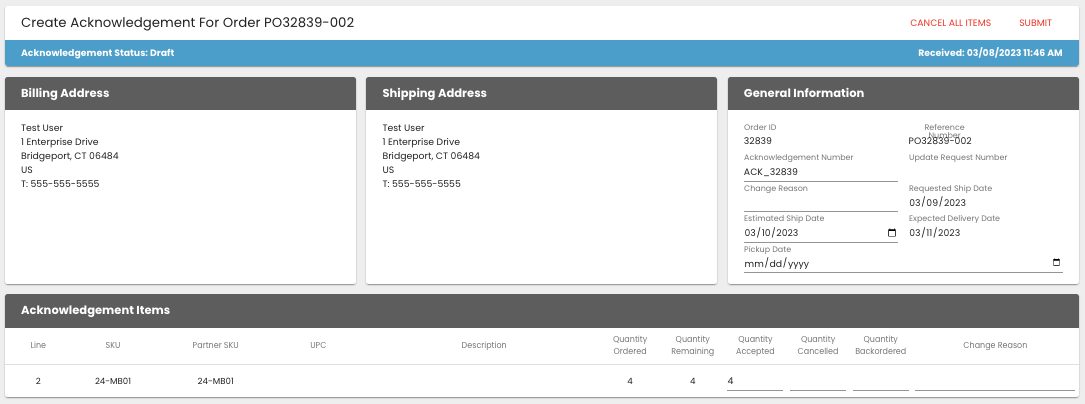
The General Informationsection will include:
-
-
- Reference Number(aka Purchase Order Number), which is typically the connecting identifier between all documents.
- Acknowledgment Number is a unique identifier for each individual acknowledgment file that will be submitted. Logicbroker auto-populates the field but it can be modified as needed.
- Estimated Ship Date This should always be provided when a backorder is being submitted. If there is more than one in-stock date due to multiple items being on backorder, select the date furthest out.
-
Note:
If you create more than one acknowledgment for an order (Example: accept all items initially, then you need to cancel an item), you will need to modify the Acknowledgement Number on the 2nd acknowledgment to ensure it is different than the one created on the 1st acknowledgment. In summary, every acknowledgment should have a unique Acknowledgement Number.
- Acceptance
- All items automatically default to acceptance when an acknowledgment is created.
- To submit a full acceptance of all items on an order with no changes only requires you to click on Submit(top corner of the page).
- Cancel(aka Reject)
- To cancel items, go to the Acknowledgement Itemssection and update the Quantity Cancelledfield with the quantity you want to cancel/reject for that line.
- For example, if quantity 2 is ordered and you want to cancel quantity 1, enter quantity 1 in the Quantity Cancelledfield.
- Enter a cancel reason in the Change Reasonfield next to each item (just to the left of Quantity Accepted).
- Click Submit(top right corner of the page) to complete.
- You may also cancel the entire order without changing any quantities in the Acknowledgement Items section by clicking on Cancel All Items(top right of the screen).
- To cancel items, go to the Acknowledgement Itemssection and update the Quantity Cancelledfield with the quantity you want to cancel/reject for that line.
IMPORTANT: Because cancel data is sent regularly, make sure your cancellation is 100% accurate before clicking on Submit. The ability to fix a mistake is very limited and could have a negative impact on the customer.