Note: You will need to reapply these settings once you move to the production portal as settings do not carry over from stage to production.
Set up your connection (API/EDI/Shopify/ShipStation suppliers)
*This step is required for API, EDI, Shopify, and ShipStation suppliers
- API Suppliers: Generate a stage API key from the API page
- EDI Suppliers: Add your stage EDI connection from the EDI page
- Add EDI Qualifier and ID your under My EDI Identifiers
- If connecting via AS2, complete the following steps:
- Add your AS2 certificate under My AS2 Certificate
- Under My EDI Connection, click to Add a Connection Override
- Select your AS2 connection method (HTTP or HTTPS)
- Add your AS2 URL and ID, select STAGELOGICBROKERAS2 for Logicbroker's ID, and select your certificate
- Click Test Connection to make sure you receive a successful test notification
- Click Save to complete the process and save your EDI connection
- Shopify Suppliers: Add your stage Shopify connection from the Connectors page
- You can reference this guide for connecting to Shopify through the Logicbroker portal
- ShipStation Suppliers: Please reach out to support@logicbroker.com to confirm that you would like to connect your ShipStation to Logicbroker for PetSmart. The support team will enable the connection for your account
- Then, add your stage ShipStation connection details from the Connectors page
- You can reference this guide for connecting to ShipStation through the Logicbroker portal
- Then, add your stage ShipStation connection details from the Connectors page
Set up shipping SCAC codes (optional)
*This step is optional for API and EDI suppliers
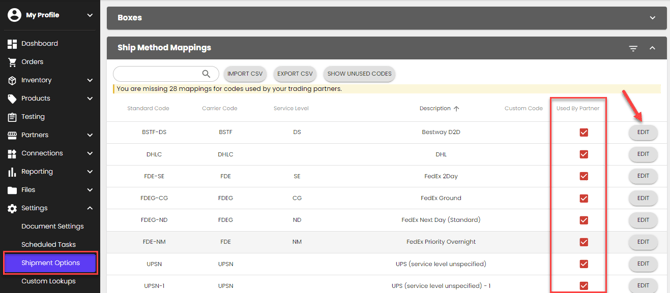
If your system uses a different code than the one listed under Standard Code, you will need to add a Custom Code so our system can match your Custom Code to our Standard Code. Our system will translate your custom code to our standard code on all orders and return documents. If a code is received that is not mapped, you may receive an error and your document may fail. For more information, see Shipment Options.
- In the Logicbroker portal, go to Settings > Shipment Options > Ship Method Mappings
- You will see a list of all the ship methods that all your retailers accept (to see partner-specific ship methods, scroll down to Partner Ship Method Mappings).
- If the Standard Code column lists a code different than the one in your system, click on Edit > add your Custom Code to map a Custom Code for our system to recognize the code you will be sending
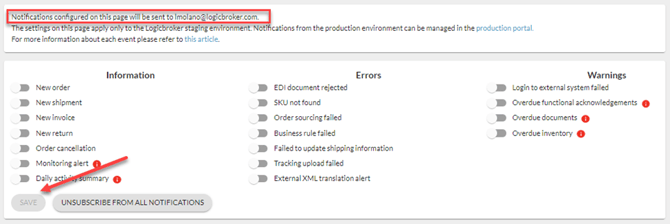
Set up notifications (optional)
You can customize email notifications. Notifications need to be set up on an individual user basis. If you turn on a notification, it will not be sent to all users in your company. For more information, see Notification Explanations.
- In the Logicbroker portal, go to My Profile > Notifications
- Toggle on the notifications you wish to receive through email
- Save